Sunday, January 30, 2011

Paint...It does a hutch good.

So I have been wanting to paint a piece of furniture for a while.  I even almost had you guys vote on which piece would be first.  Lame, I know but I enjoy this blogging thing and most of my home projects revolve around how I'm going to blog about them.  Lame again.  Oh well...That's me.  Take me or leave me.

Remember this piece of furniture...

 The big one in the back.
This one.

You've got it.  The hutch won the Russian roulette of my paint brush.  I was home all of like 12 hours when B and I headed out to our local home improvement store and stocked up on supplies and got started.

Supplies:
Electric sander 
(Sure hand sanding has its own rewards -although I can't name any- we prefer a turbo powered option)
Cheapo plastic drop cloth
Paint brush
Roller
Paint tape
Paint
Screw driver
(once again we like the powered kind)
Paint

Now we already had some of these things so it ended up being a cheap project.
1.  Remove doors  
 Guess you don't have to, but I'm not a good painter so to save the hardware, this was a must.

2.  Sand 'til you can't sand anymore.
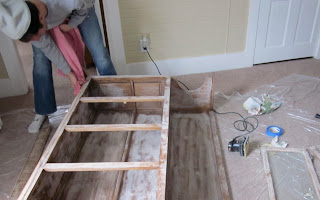
 B hard at work sanding.  Yes he is wearing a toboggan.  It was cold that day and we're cheap.
Post sanding.  Looks like we killed her doesn't it.

3.  Wipe it down.  There is a lot of dust involved in sanding.
Yes we are doing this inside.  Maybe not a good idea.  So I don't advocate it, but I like to do all my projects inside. 

4.  Paint away.  Sorry no photos of the first two paint sucking coats.  Who would have thought white paint would take three coats, but I'm told oak wood does that.  Learn something new every day.  B finished the tedious work while I was gone.  And I came home to #5.

5.  Enjoy the finished project!
Not the best picture but I'm in love.
I'm trying to use it functionally to store all my dishes and not just to display them.  But I want them to at least look prettier than your average stacked dishes.  This is my attempt at one of the cabinets.
Yea...not that pretty but I'll work on it.  

Thanks for indulging me and letting me share my new fav project!  
Other projects potentially in the works...
my closet
upholstered headboard
curtains
craft room/nephew hangout
hutch #2
kitchen cabinet update
painting the appliances (yes that is possible)
outdoor overhaul
...etc.

See you again soon!
Court

Monday, January 24, 2011

Got nothing! Well, maybe a little something.

I know I have not posted.  But I've got nothing!  My life is upside down.  B and I just moved.  We are only 50% unpacked and only 10% organized.  And I am living in Jackson, Tennessee.  I'm going mad being in upheaval.  So as you can imagine I haven't gotten a lot of projects done.  I have a couple half done.  B is finishing our hutch remodel this week.  Post to come.  

The only project I have gotten done is one I made with my new cricut.  

Santa got a fabulous deal on it this year so my craftiness just got a boost!  I made two name banners for my adorable nephew, Coleman...
Sorry...terrible cell phone picture.
and the first baby girl in my life, Charley!
Paper for Charley's poster...Yes that is pink glitter paper.  Every baby girl deserves glitter paper.
Only 4 more weeks until she arrives!
I didn't get great pictures of them.  Sorry.  But they were fun to make and I learned a lot.  Like bubblegum pink glitter paper doesn't show up great from greater than 3 feet.  Lessoned learned.  
I've also spent a some time with my Cubby bear!  No post is complete without him!
No newborn likes to sit up more than Coleman.  He has to be able to see (like 12") and be in on the action.  He doesn't like to miss anything.  He gets that from his Momma!

Cubbie loves his Bun Bun that holds his paci and his rattle.  He holds onto it so his paci will stay in.    Okay he doesn't care much about the rattle yet but he'll hold if I make him.  The part about Bun Bun is true though.  I wouldn't joke about that important friend.  Bun Bun makes cubbie happy which makes all the rest of us happy.

  Coleman's first day at church.  That church family loves him more than any baby I've ever seen.  It is the sweetest thing!

A video for Aunt Bara and Auntie Milly.
Please IGNORE the voices in the background...Especially my annoying aunt voice and the shaky camera work.  Most of you may find the video boring but Coleman rewards us at the end with what he does best.

Thursday, January 13, 2011

Got Christmas Money? ...I've got your answer!

I know if you are like me some of you have some Christmas money just burning a whole in your pocket.  Have I got the best way for you to spend it or what?  I know, like any good friend I will not leave you in the dark when I love something.  And I love adoption.  I read tons of blogs every day ...yes everyday... and I fall in love with these children more every day and I fall in love with the families that love them.  You may have noticed...or probably not as you don't stalk every corner of my blog, so let me direct you to the list on the right column of my blog showing my fav adoption blogs.  You will fall in love too!  There is one in particular I want to share with you today.


Ashley and Nate Miller have the most adorable family.  They both went to Lipscomb like me.  We didn't really know each other well in school but you know how it goes...we have a couple of mutual friends and with the adorableness that is their children its hard not to notice them.  God has called them to adopt a little boy from Ethiopia, which is so exciting.  You can read all about this journey they have been on here on their blog.  But yuck...adoption is super expensive.  Trust me I have done my research.  If you know me well, then you know I do research before making decisions...I even made a pros and cons list before deciding to date my now husband...extreme I know, but that's for another post.  Back to the Millers, they are selling 147 Million Orphan gear to help fund their adoption. (See their super cute gear in their family picture above!)  It is a fabulous organization.  Check it out here.
Example:this gorgeousness, I just purchased...
Doesn't it look buttery soft!  I'm so excited!

You can purchase yours here Purchasing this shirt will provide food, water, or medicine for a child in need meaning 50% of the profits of this shirt will go to a child in Uganda, Ethiopia, Honduras, China, or Haiti.  And the Millers will receive a portion to go toward their adoption cost!  So email Ashley today to get yours!  They have cute kids t-shirts too!  You have to order through Ashley for the purchase to count for their family. 


They are also selling Magazine bead necklaces which are super cute!  The women of the Karamojong tribe create these beautiful necklaces by hand from re-cycled paper … 147 Million's goal is to help these women maintain sustainable income for their families.  I think all of you could rock these necklaces as a serious fashion statement!  So head over to Bringing Nolan Home to get yours today!  

 If your family was stepping out to follow God's calling for your life, wouldn't you want people to be supportive of you?  I know I would.  

Monday, January 10, 2011

2011...The year of DIY design

I know what you're thinking...And yes I'm sure it wasn't 2010.  B and I just moved and now that we have a little more space we can totally DIY it up!  And as you would have it, I have a lot of time on my hands because I am out of town for 7 more weeks on a clinical rotation.  So since I'm without my B, I have been scouring my favorite design blogs!  Here are a few of my new fav's...

Cassie over at hi sugerplum! has some cute ideas I just might steal this year.  Check out my fav's!

Painted hi-boy dresser!  Love it!  

Yucky bronze chandelier...granted yucky is in the eye of the beholder.
I like it and it only cost the amount of the spray paint...which you probably already have!


Cason and Shelley over at the House of Smiths also have some cute DIY projects...like...
The most organized wonderful pantry ever....awe...I love it.

Making a boring mirror look custom and beautiful.


My old standby fav's are...
You've heard me mention her DIY chandelier before...

I love open shelves in the kitchen like Britt did here!
And my momma found me some milk glass like she has here at my Papa's!  I'm so lucky to have a certified junkologist for a granddad!  No I'm not kidding.


I love her new headboard...I might make one this year.  On a smaller scale of course.

I'm definitely doing this project this year!

I love most everything these girls do...I'm sure this isn't the first time you've heard me talk about them and it won't be the last.

Hope you are as inspired as I am!

Thursday, January 6, 2011

Pretty little trays

So I wanted a DIY project for Christmas gifts this year...SO...after checking out one of my favorite design blogs, Isabella and Max, I decided on making pretty little trays like she did here.  Now hers were quite small, like for jewelry or keys ,yada yada ...but I decided on my gifts being a larger tray although I did make a couple of the small rectangle ones.  Don't know what I will do with those yet...they may be headed to your house in the form of a hostess gift in the near future...well not these exact ones, obviously, mine are probably less pretty and definitely less polished and exact but I'm new at this DIY/craft thing.

So here how you can do it...
1.  Gather supplies: 
*Cute scrapbooking paper (I think hard to come by at my local stores)
*Trays of the size and shape you choose
*Paint brushes
*Glue (I used Martha Stewart) or Mod Podge
*Paint
*Water based polyacrylic (to seal it with after you finish the glueing and painting)
*Ruler
*Scissors
*Pencil

2.  Paint
No need to paint the surface of the tray as it will be covered with paper.  But I recommend painting the bottom just so its "finished looking".  I took me 2-3 coats to get a good color, but the painting is quick.  I painted with a larger paint brush than those shown above.  Those were for finishing touches and glue.
Carebear, my crafting helper!

Oh and add to the supply list:
*Drop cloth...that's what is shown above.  
(I'm not your grandmother with a plastic mat down over the carpet so the little ones don't make a mess of the carpet.)
*Hair dryer...if you want to speed up the drying process.

3.  Take accurate measurements of the inside surface of the tray.  (This can be tricky...if you're me anyway.)  Then mark it off on your favorite paper and get to cutting.

All my PT friends out there, Yes you are correct I am using a goinometer as a ruler.  Believe it or not, its the only ruler I could find.  Very uncrafty of me I know.  This is kind of ruler I want...But I don't even know where to find one.

Maybe Caity at Craft Day is the Best Day can tell me.  She's my crafting mentor and idol!

4.  Apply the glue to the surface of the tray.
5.  Slowly apply the paper and try to press it flatten out the paper.  If you're like me, there will be wrinkles, but oh well...its character.
6.  WAIT...let the glue dry!
7.  Paint it with several coats of polyacrylic!  

Waalaa... Little trays.

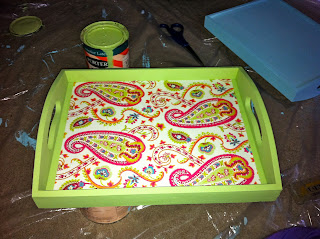
 Big trays.
Warning:  The green is not as neon as it appears!

Yes...cell phone pictures.  Blogger FAIL.  Sorry guys.
But that's it.  Fun gift.  Fun craft.  Fun Fun.
Related Posts Plugin for WordPress, Blogger...