
Okay so I didn't exactly start off 2012 on a blogging bang. Sorry guys, I've been reading the Twilight series 4 years later than the rest of you, so I have been a bit busy hiding under the covers speed reading.
I was off work for an extra day to start off 2012. I hope that is a great predictor of what is to come this year. However, the long weekend wasn't all pillows, rest, and pajamas. We had to get a little accomplished on our rare time at home. I decided a good cleaning was in order. So I hopped on over to Pinterest for a little inspiration.
I had 3 conditions...I wanted something cheap. Homemade. And Natural.
Who doesn't love to save money. Although I don't live my life in full embrace of the organic and natural lifestyle mostly due to the my first condition...cheap, I do believe it is important. I don't want my first born, Paisley Blue, to be licking bleach off the floor. It just can't be good for her. And homemade just feels good and it is the best way to save money.
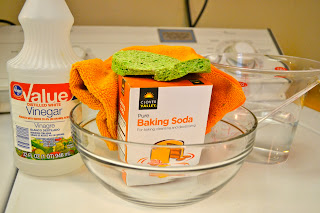
While doing research pre-project I learned a lot about natural cleaning. Thanks in part to the Pink Pistachio I learned about a few simple ingredients I needed to gather.
Baking Soda -- Cleans, deodorizes, and scours
White Vinegar -- Kills 99% of bacteria and 80% of viruses, cuts grease
Citrus -- acidity is antibacterial and anti-fungal, bleaches, removes stains
Soap -- cleans, cuts grease
I also needed a few handy tools.
Empty spray bottles -- If you are really green, you could upcycle some old bottles you are no longer using. However, if uniformity if important in your obsessive compulsive brain like it is in mine, you can pick up a few bottles at the Dollar Tree for guess what? $1.
Sponges -- I chose Scotch-Brite greener clean sponges.
Rubber Gloves -- Baking Soda paste is hard on hands.
I chose to tackle the kitchen first. I made a simple all-purpose solution to use to clean just about every surface in my kitchen, from countertops to appliance fronts.
DIY All Purpose Cleaning Solution: 1 Tbsp baking soda, 1/2 tsp. dish soap, and 2 Tbsp. vinegar. Combine in a spray bottle and shake. Let it rest. It will need it because the chemical reaction is crazy and bubbles fill the bottle in no time flat. Fill the remainder of the bottle with warm water. Add 1 Tbsp. of fresh lemon/orange juice for a little extra bam and a nicer scent.
I'm not going to lie, the spray smells of vinegar, but who cares, its clean and the smell fades in a little bit. If you are really worried about the smell or just can't handle it, buy some of that expensive essential oil and toss in a drop or two. I'll stick with my cheap fresh squeezed lemons.
Cost = like cents. I can't even do math that small. Oh wait, I can and I did. Like 4 cents for a 24 oz bottle. I could pick that much off the floor at the grocery store. So like FREE!
Next on the battle plan, the microwave. Oh what a battle it was. You know those things you have been meaning to clean for some time. Every time you see them, you think...I really should clean this soon, but you are too busy or hungry in this case to do it right then. Yea, I had been thinking that for a long while with this microwave. I am going to be brave and show you pictures. Judge me all you want . If I cared I wouldn't show you the picture.
Here is the before...
 Aaaaahhhhhhh! I know its scary.
Here is how I got it clean.
 1. Put one or two cups of water in a large, heat-proof glass or ceramic bowl. Add 1 Tbsp. of white vinegar.
2. Microwave until about half the water is evaporated. (I just kept checking every few minutes.)
3. Wait about 10 minutes and don't open the door. This allows the steam to penetrate the baked-on nastiness and the water can cool off a bit. Be careful the water will still be hot when you remove the bowl.
4. Scrub the walls of the microwave with a sponge sprinkled with a bit of baking soda.
5. Wipe down the microwave with a reusable cloth dampened in clean water and the oven will be sparkling clean and odor-free.
Voila.
 I still smile every time I open the microwave door.
Stay tuned for a tutorial on DIY swiffer refills.
I was off work for an extra day to start off 2012. I hope that is a great predictor of what is to come this year. However, the long weekend wasn't all pillows, rest, and pajamas. We had to get a little accomplished on our rare time at home. I decided a good cleaning was in order. So I hopped on over to Pinterest for a little inspiration.
I had 3 conditions...I wanted something cheap. Homemade. And Natural.
Who doesn't love to save money. Although I don't live my life in full embrace of the organic and natural lifestyle mostly due to the my first condition...cheap, I do believe it is important. I don't want my first born, Paisley Blue, to be licking bleach off the floor. It just can't be good for her. And homemade just feels good and it is the best way to save money.
While doing research pre-project I learned a lot about natural cleaning. Thanks in part to the Pink Pistachio I learned about a few simple ingredients I needed to gather.
Baking Soda -- Cleans, deodorizes, and scours
White Vinegar -- Kills 99% of bacteria and 80% of viruses, cuts grease
Citrus -- acidity is antibacterial and anti-fungal, bleaches, removes stains
Soap -- cleans, cuts grease
I also needed a few handy tools.
Empty spray bottles -- If you are really green, you could upcycle some old bottles you are no longer using. However, if uniformity if important in your obsessive compulsive brain like it is in mine, you can pick up a few bottles at the Dollar Tree for guess what? $1.
Sponges -- I chose Scotch-Brite greener clean sponges.
Rubber Gloves -- Baking Soda paste is hard on hands.
I chose to tackle the kitchen first. I made a simple all-purpose solution to use to clean just about every surface in my kitchen, from countertops to appliance fronts.
DIY All Purpose Cleaning Solution: 1 Tbsp baking soda, 1/2 tsp. dish soap, and 2 Tbsp. vinegar. Combine in a spray bottle and shake. Let it rest. It will need it because the chemical reaction is crazy and bubbles fill the bottle in no time flat. Fill the remainder of the bottle with warm water. Add 1 Tbsp. of fresh lemon/orange juice for a little extra bam and a nicer scent.
I'm not going to lie, the spray smells of vinegar, but who cares, its clean and the smell fades in a little bit. If you are really worried about the smell or just can't handle it, buy some of that expensive essential oil and toss in a drop or two. I'll stick with my cheap fresh squeezed lemons.
Cost = like cents. I can't even do math that small. Oh wait, I can and I did. Like 4 cents for a 24 oz bottle. I could pick that much off the floor at the grocery store. So like FREE!
Next on the battle plan, the microwave. Oh what a battle it was. You know those things you have been meaning to clean for some time. Every time you see them, you think...I really should clean this soon, but you are too busy or hungry in this case to do it right then. Yea, I had been thinking that for a long while with this microwave. I am going to be brave and show you pictures. Judge me all you want . If I cared I wouldn't show you the picture.
Here is the before...

Here is how I got it clean.

2. Microwave until about half the water is evaporated. (I just kept checking every few minutes.)
3. Wait about 10 minutes and don't open the door. This allows the steam to penetrate the baked-on nastiness and the water can cool off a bit. Be careful the water will still be hot when you remove the bowl.
4. Scrub the walls of the microwave with a sponge sprinkled with a bit of baking soda.
5. Wipe down the microwave with a reusable cloth dampened in clean water and the oven will be sparkling clean and odor-free.
Voila.

Stay tuned for a tutorial on DIY swiffer refills.
No comments:
Post a Comment