Wednesday, March 30, 2011

Let's Have A Vote!

Everything in my life is usually just new to me.  Not new to the universe.  I'm one of four and sure we had plenty of new clothes in our days but when I was little I don't remember going to the store often and getting excited about buying a new pair of jorts (totally sported light denim to the knees shorts with a rolled hem and some splatter paint accents!) or a dress.  I remember getting super excited when a new bag of clothes arrived from one of several older girls at church.  We all immediately dove in and tried everything on!  I'm not ashamed to love hand-me-downs!  So of course I'm so excited about my 3 new to me items for the house.  

First, I got a new recliner for B.  Yes it is retro.  Yes it is green.
But I love it.  You can't really see in the picture, but it has beautiful nail head trim.  And guess how much I paid for it??????  $10!!  That's right only 10 bucks at the local Habitat Restore!
If you only knew how pink the original recliner was.  Being married means compromise, right?

The last two are light fixtures.
On the right:  The cool-bird-cage-looking-awesomeness that is this light fixture.  I don't know where it came from or why there are vines growing on it.  But my Junkologist Papa had it in his barn and let me have it.  For free!  I'm a lucky girl!  Can't wait to find a place for her!  
Am I the only one who likes her?

On the left:  The Big Brass Chandy from Habitat Restore
  It was only $20.  And its heavy and nice.  Yes, I find this to be a deal.  I love chandeliers!  But this one, definitely needs a paint job!  Can I get an Amen?   I  may do it up something like this that I found out there in blogland by adding beads and sparkly things.

Or maybe something simple like this by Centsational Girl.

These are also super fun!

Let's have a vote!
Please vote below and give me your honest opinion.  Trust me.  My mom always does.  I like a straight shooter.


What shall the fate of the brass beauty be?
Thanks for voting!  I need all the help I can get with my indecisive-home-design-self!
I love all my hand-me-downs!  Hope you can find joy in the old and new in your life too

Sunday, March 27, 2011

Celebrations and Junking

I had a fabulous weekend!  It all started with an adult slumber party complete with a Wildcats' Win!  Go Big Blue!  Waking up and drinking coffee with some of our closest friends is one of my simplest joys!  

Next...a delightful brunch to celebrate my favorite designer and most creatively talented friend, Caity Shinnick
Happy birthday, sweet Caity!

Then I spent Saturday afternoon, "Junking" it up at my local flea market!  Its only my second experience with the flea market.  I know what planet did I grow up on!  Its strangely wonderful.  It brings out the worst in my second-guess-every-single-purchase personality.  Luckily once I got these beauties home I only ever so slightly regretted one...kind of.  See my newest treasures!

A Desk for my Guest Room
I see POTENTIAL!  Do you?  My hubby isn't so sure, but I love the pulls on the drawers.  I think it could be beautiful white washed.  And I see potential for a lovely vanity in a sweet princesses room one day.  I just see the possibilities.  Keep your eyes tuned to the blog for the future face lift of my newest solid wood beauty.

Fabulous Ornate Antique Table
Isn't she a beauty?  She needs a little TLC.  A good wipe down and sanding for sure.  I don't know if I can paint her because I love her just the way she is.

Nic-Nac Fav's!
 3 Wood blocks in my favorite colors!  I'm planning them for a potential gallery wall.
And ...I know I know I need to expand my color palate.  Trust me I've got plans to bring in some new hues!  Stay tuned.  
Then a cute cute cute adorable little blue jar to add to my blue jar collection.  $1.  I love miniature things!

A Mini Milk Glass Vase to match my big boy vase.  
Milk glass is my newest collectible.  I know you must be thinking she collects a lot of crap.  Which is not true!  I collect blue jars.  Milk glass.  I think thats it.  My husband might be able to add to the list of what he considers "grandma things" but I love them!

A Pretty Print

MY ABSOLUTE FAVORITE THING I GOT ALL DAY!  THE DIRECTION WIND/BARN THINGY!  Isn't it fabulous?!!!!!  I can't stop looking at it.  And better news...It was only $3!!!  $3!

Oh the joys of scavenging the flea market!  I'm in love with my new finds.  Hope if you went, you found some new loves too!

Thursday, March 24, 2011

It was the best!

We had such a fun weekend last weekend celebrating our nephew, Copelan's, 3rd birthday and our brother-in-law, Chris's, birthday!  My sister-in-law and I went shopping while the boys all hung out together at home.  Such a treat for me and a nice day out alone for Whitni.  We always have fun shopping for good deals!  

The boys spent the night with us and we had a blast.  We watched my favorite disney movie, Mulan!  We played at Charlie Daniels's Park.
Caden said, "This is the best park I have ever been to!"  It doesn't take much to make a 6 year old have fun. 

Note to self:  There is a lot of people watching to be done at the park.  And even more noteably, the park brings out all different types of parenting styles...
...the dad outside the fence on his cell phone walking up occasionally to check in,
...the cute mom in the Coach glasses gabbing with all the other moms within eye sight of blood and screaming,
...the unknown, no where to be found parent with the kid who's kicking sand everywhere into everyone's eyes...ahhhh,
...the way too close mom who's snapping pictures of every detail of their perfect child's sandbox experience,
...the in-between parent who's close and stops sand throwing but is chill and people watching,
...then there is every parent in-between.  I think I will be all of the above at some point or another.  No judgement for any of the kinds...Its just too funny to sit there and watch all of the park characters interacting. 

On the way home from the park while we were waiting for the boys favorite food, pizza, we had a dance party.  Yes, Aunt Neet Ney is so proud!  Caden knows the Biebs!
So fun!  Copelan was much too tired despite his denials to really participate.  Caden was grooving and singing along!  Sorry for the loud aunt voice and the iphone videocamera.

Birthday cake before bed.  Its so fun being the birthday boy!

Mulan Movie Snuggle.

 Ready for church.
Fun Fact:  Caden can read.  READ!  He's so big.

Can't wait for everyone to come visit again!

Sunday, March 20, 2011

From College Dorm and the Attic to an Updated Dining Room

This week was a race to a "finished" home.  My sister- and brother-in-law were coming into town with our adorable nephews and I wanted all the rooms in my house to at least be livable.  You know what I mean take the mattresses off the floor and put them on a bed frame with at least some semblance of cute bedding.  Shove all the boxes yet to be completely unpacked into the nearest closet.  Make sure each room at least has a lamp (we live in an old house where overhead lighting was obviously not a priority.  You get what I'm insinuating...the mad dash that you hope no one notices when they arrive.  Luckily it was just family coming in but I'm a perfectionist so I had to at least try to get it together around here.

After mom and I attacked the guest room on thursday, friday night I decided to to put forth my first attempt at covering a lamp shade.  Here's how I went about it...

I read this tutorial sort of...You know me, I scan the picture captions and then just wing it.  Patience is not one of my greatest virtues.

Supplies:
Lamp shade that needs updating
Lamp base
Fabric
Scissors
Fabric glue
Newspaper
Pencil

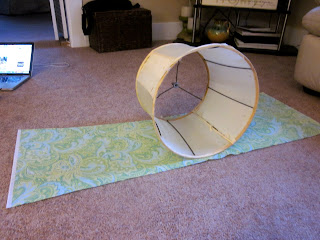
First... Start with a hideous lamp shade.
Done.  Those are some stanky stains.

And in my case a boy's college dorm room lamp base...not fit for an adult home.

Second... Find a fabric you love. 
Sorta done.  I like it.  I would prefer it to have been simpler.  It wasn't my vision but I've found that ...1.  I'm cheap.  2.  My vision isn't always simple to find when I up and decide to do something in one night.

Third...I made a template of the curve of my shade out of newspaper by rolling it along the paper while lining with a pencil.
Truth:  I bought a fabric pencil at JoAnn's which was a total bust.  I couldn't even see it.  It said it worked on both light and dark fabrics.  NOT.

Fourth...Cut it out.

Fifth...Start adhering the fabric to the shade with fabric glue.  Be sure to apply pressure for a few seconds after applying the fabric to the glue to assure a good stick. 
Sixth...Trim excess fabric leaving enough to fold over the edges and adhere to the inside of the lamp on the top and bottom.
Steps 5 and 6 were a test in trial and error.  I didn't know what I was doing and slowing figured out I could have gone about it better, but that's how first time DIY things go.  The first times not the prettiest but it works.
P.S.  I totally over did it with the fabric glue!

After finishing adhering the fabric to the shade, I needed to convert the lamp shade from that big piece that comes down on either side of the bulb and attaches to the lamp base to a piece that clamps onto the bulb itself.  Because I'm placing this shade on a lamp base that doesn't have those pieces.  

So instead of rigging it up with hot glue I just bought a $4 clamp piece.

Finished product:

Well for now.  I need to add a simple trim to each side to give it a more finished look.
What do you think?

Sunday, March 13, 2011

Glue Never Hurt So Good

So I started this project when I was down for count momentarily with strep.  After a painful shot in my fanny I was practically as good as new the next day.  I had been planning this project FOREVER and finally got around to then it took me 3 weeks to finish it. Typical.  But at last it is done.  
The Book Page Wreath!  
Like these...

Now I didn't do a complete tutorial but you can read the two above for complete step-by-step details.
Living with Lindsay
Jones Design Co.
I started by gathering my supplies:
Foam wreath (mine was 12")
One tutorial I read said they found their foam wreath for $1 at dollar tree.  I couldn't find it!  Insert mad noise.
Old book bookS  (1st one...80 cents at Goodwill!  2nd-one-I-didn't-think-I-would-need-after-300+-page-1st-one...courtesy of my parent's treasure chest garage!)
Glue gun with glue sticks
A strip of ribbon and a straight pin for hanging when your done.

First lets talk about folding...actually its more rolling because you don't actually want to put any creases in the paper.
These are 3 of the most common rolls I chose to use and variations of the like.  You can do whatever with the paper.  Its your wreath.  Do it your way.
**Every time I say I made a wreath.  I feel like a 90's housewife decorating my country style home with a baby's breath wreath mixed with cinnamon sticks or something.  Woof.  ...  I have to remind myself it can be cool to make a wreath.  It can be cool.  It can be cool.**


Once you roll it your way, you will need to put a drop of hot glue between each layer or at least the ones making it hold its shape so that it won't come unrolled as you affix it to the wreath.  This is especially true for the first and last couple of layers.  But if you are anything like me, I just did it the whole time just in case.  I chose to place my pages with the torn end out for a more ruffle-y look.

Layer 1--Hot glue to the underside of the wreath.  Then, flip it over to continue layering.
Layers 2 thru 100 (or so it felt) -- Keep up the good work...rolling, glueing, layering.
After you feel like your done...You're might not be.  You need to fill in the gaps for a fuller wreath look. Just roll, cut off the clean end to make it short enough to just stuff in where you have a hole in you fullness.
**BEWARE:  Hot Glue is a weapon.  It will burn like the dickens.  You can use the blunt end of a pencil to help you push the paper into place if you want to be smart or you can endure the pain like I did.**

At some point early on, you may need to weigh down the wreath for a bit so the wreath will be able to hang mostly flat to the wall.
I used a big book.  Worked like a charm.
Half-way:
Finished project:
Not hung in its final destination but I haven't decided where that will be yet.  Sounds like everything in my house right now.

I love it.

We also finished a second project.  I can hear your gasp through the computer.  I know!  2 projects done in one post.  Its unheard in the Steele household in 2011.
Our second hutch.

Sorry my pictures aren't the best of it.  Its not as neon as it appears.
I worked yesterday on distressing it.  I'm no expert.  Its completely imperfect.  But isn't that the point?  I hope so because it definitely has a few sand paper slips.
Related Posts Plugin for WordPress, Blogger...