This week was a race to a "finished" home. My sister- and brother-in-law were coming into town with our adorable nephews and I wanted all the rooms in my house to at least be livable. You know what I mean take the mattresses off the floor and put them on a bed frame with at least some semblance of cute bedding. Shove all the boxes yet to be completely unpacked into the nearest closet. Make sure each room at least has a lamp (we live in an old house where overhead lighting was obviously not a priority. You get what I'm insinuating...the mad dash that you hope no one notices when they arrive. Luckily it was just family coming in but I'm a perfectionist so I had to at least try to get it together around here.
After mom and I attacked the guest room on thursday, friday night I decided to to put forth my first attempt at covering a lamp shade. Here's how I went about it...
I read this tutorial sort of...You know me, I scan the picture captions and then just wing it. Patience is not one of my greatest virtues.
Supplies:
Lamp shade that needs updating
Lamp base
Fabric
Scissors
Fabric glue
Newspaper
Pencil
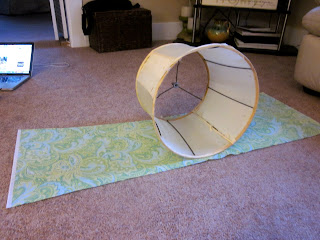
First... Start with a hideous lamp shade.
Done. Those are some stanky stains.
And in my case a boy's college dorm room lamp base...not fit for an adult home.
Second... Find a fabric you love.
Sorta done. I like it. I would prefer it to have been simpler. It wasn't my vision but I've found that ...1. I'm cheap. 2. My vision isn't always simple to find when I up and decide to do something in one night.
Third...I made a template of the curve of my shade out of newspaper by rolling it along the paper while lining with a pencil.
Truth: I bought a fabric pencil at JoAnn's which was a total bust. I couldn't even see it. It said it worked on both light and dark fabrics. NOT.
Fourth...Cut it out.
Fifth...Start adhering the fabric to the shade with fabric glue. Be sure to apply pressure for a few seconds after applying the fabric to the glue to assure a good stick.
Sixth...Trim excess fabric leaving enough to fold over the edges and adhere to the inside of the lamp on the top and bottom.
Steps 5 and 6 were a test in trial and error. I didn't know what I was doing and slowing figured out I could have gone about it better, but that's how first time DIY things go. The first times not the prettiest but it works.
P.S. I totally over did it with the fabric glue!
After finishing adhering the fabric to the shade, I needed to convert the lamp shade from that big piece that comes down on either side of the bulb and attaches to the lamp base to a piece that clamps onto the bulb itself. Because I'm placing this shade on a lamp base that doesn't have those pieces.
So instead of rigging it up with hot glue I just bought a $4 clamp piece.
Finished product:
Well for now. I need to add a simple trim to each side to give it a more finished look.
What do you think?


Love it! :) I just posted a before and after on our blog (loganandjill.blogspot.com) and light fixtures are next on my to-do list, so this was super helpful! :)
ReplyDeleteLove you!
Look at you go! I would never have guessed the finished product started with a stanky stained lamp shade and a college boy's tall skinny lamp stand :)
ReplyDelete