Showing posts with label Crafting. Show all posts

Friday, November 4, 2011

Trim Your Tree In Thanks

Last year I made a Halloween tree with cute and creative Caity Shinnick!  
(I love to use alliteration with her name!!)

But this year after hours of searching, my tree was present and my ornaments were not.  Sad day.  So I began anew with a brand new focus.  A fall/Thanksgiving tree that I could keep up for both October and November.  My sister Candace was in town so we decided to make a project of it.

Base Supplies:
Small flower pot...ours were terra-cotta, approximately 8-10 inches in diameter
3 Branches, ideally with lots of small branchings off of them
Floral foam to hold your branches at just the right angles
Moss to cover the unsightly foam

Decorations:
Stickers
Pom pom balls
Scrapbook paper cut outs 
Candy corn 
...or Candy Pumpkins would be so cute!
Foam shapes
Whatever strikes your fancy in the wonder world of Micheals or Joann's...like these...

Miscelleanous supplies:
Glue Stick, Hot Glue Gun...basically your adhesive of choice.
Thread in colors of your choosing
Big Needle
Glitter because every craft needs it!

Assemble your base.
Shove a big piece of floral foam into the terra cotta pot.  I also cut some small pieces to shove along the edges of my circular pot to stabilize the big square chunk I cut to place the branches in.  Hold up your branches and decide how you want them to look.  Then with a little umph...shove them into the foam.  Its nice to have a partner who can hold two of the branches in their correct positions above the foam while you place first branch and so on.

Get your craft on!  Make as many ornaments as you want.

To make garlands, thread your needle with your favorite color thread and simple thread the needle through pom poms of varying size, color, and sparkliness!  Make as short or long as you like.  Its your tree...do what you want!  
Or you can add letters to spell out your favorite holiday saying or perhaps a monogram!  Are you nodding your head like I am?  No?  Oh.  Guess I'm alone.
 

I will admit that my Cricut made this project especially fabulous!  If you do not have a cricut, there are a variety of options out there you can purchase pre-cut or if you have a way with scissors you can make your own.

And don't forget...Crafting is messy.  Just enjoy it.

 We had fun!  Even Cara got in on the crafting.
But no craft session is complete without a little Cubby cheer!

Our finished products!
Candace's:
 Mine:

You still have plenty of time to make one for your Thanksgiving celebration!  Get your craft on ladies and gents!

May I also suggest having small leaves or pumpkins or tags in a dish my the tree with your favorite pens close by.  Your family can write what they are thankful for this season and place them on the tree for everyone to enjoy.  
What a wonderful way to share in the joys of the season!  God has truly blessed us all!

Friday, August 19, 2011

Part 3: No-Sew Fabric Flowers!

I'm super excited about our last day of the fabric flowers tutorials.  If you didn't catch the first two days, you can find them here and here.  I loved making this kind because its new, super easy and super cute!  However, I know some of you are just excited the fabric flower craze is ending today.  I guess in the end everyone is happy.  Some of you with your new fabric accessories and some of you with your i-hate-flowers-and-tutorials sanity back.  So let's dive in.

Part III:  Rolled Fabric Flower

Supplies:
Fabric of your choice
Hot glue gun
Felt
Scissors
Headband, brooch pin back, or bobby pin

Let the rolling begin!
1.  Heat up the glue gun.
2.  Tear a 1"-ish strip of fabric.  I used the scissors to start a small cut and then I tore.  I'm NOT a good tear-er.  I can absolutely N-O-T  tear a straight line, but no worries.  It didn't seem to effect the flower in the end.
3.  Fold the 1" piece of fabric in half like so.  I placed a dot of glue inside just to hold it.

4.  Begin rolling the flower like you are rolling up a ribbon.  After you have secured a tight center place a dot of glue to keep the fabric in place.

5.  Continue to roll as you gently encourage the fabric to roll out.  I didn't find that that there was a simple clean way to do this.  I just rolled with the punches and kept twisting it out.  Every so often place a dot of glue between the ribbon and the forming flower to make sure all of your hard work stays together.

6.  Keep on rolling until you run out of fabric or you reach the flower size of your choice.  I made all different sizes.
7.  Something mine ended up looking like a cone, especially if my fabric was too wide to start with.  So I just cut it off.  DIY is all about improvising right.

8.  Cut out a circle of felt and use your glue gun to place it on the bottom of the flower.
9.  Adhere the accessory of your choice.
I place a piece of felt over the base of the pin as well.  Basically only because that's what the crafty Caity Shinnick told me to do.  You should totally check out her new website!  It's amazing!  I love all of her stuff!

All done!  Wear them with pride.
 I made this one out of an old t-shirt that needed to be thrown away.  So I decided to upcycle it!  Worked perfectly and it was FREE!
I made a trio set to wear together on a white tee or as individuals.

You can find a more professional tutorial here if you want more details.  I don't take the best pictures I know.  I hope you guys and gals are inspired to whip out some fabric flowers.  Who needs to sew when you have a glue gun?  That's my philosophy.

Soon I will post about my GRADUATION (picture me saying that like Oprah because I am!) and one of my favorite and more frustrating new DIY project.  See you soon!

Wednesday, August 17, 2011

Part 2: No-Sew Fabric Flowers

Part II of the No-Sew Fabric Flower tutorials.  If you missed the folded fabric flower from yesterday you can run back and read it here.  

The  Button Flower

Supplies:
2 Fabrics of your choice (if you do one like mine)
A pretty button
Hot glue gun
Felt
Pen for tracing
Scissors
Headband, Bobby pin, or Brooch pin back

1.  Heat up your glue gun.
2.  Cut a nickel or quarter size circle out of felt as your base.
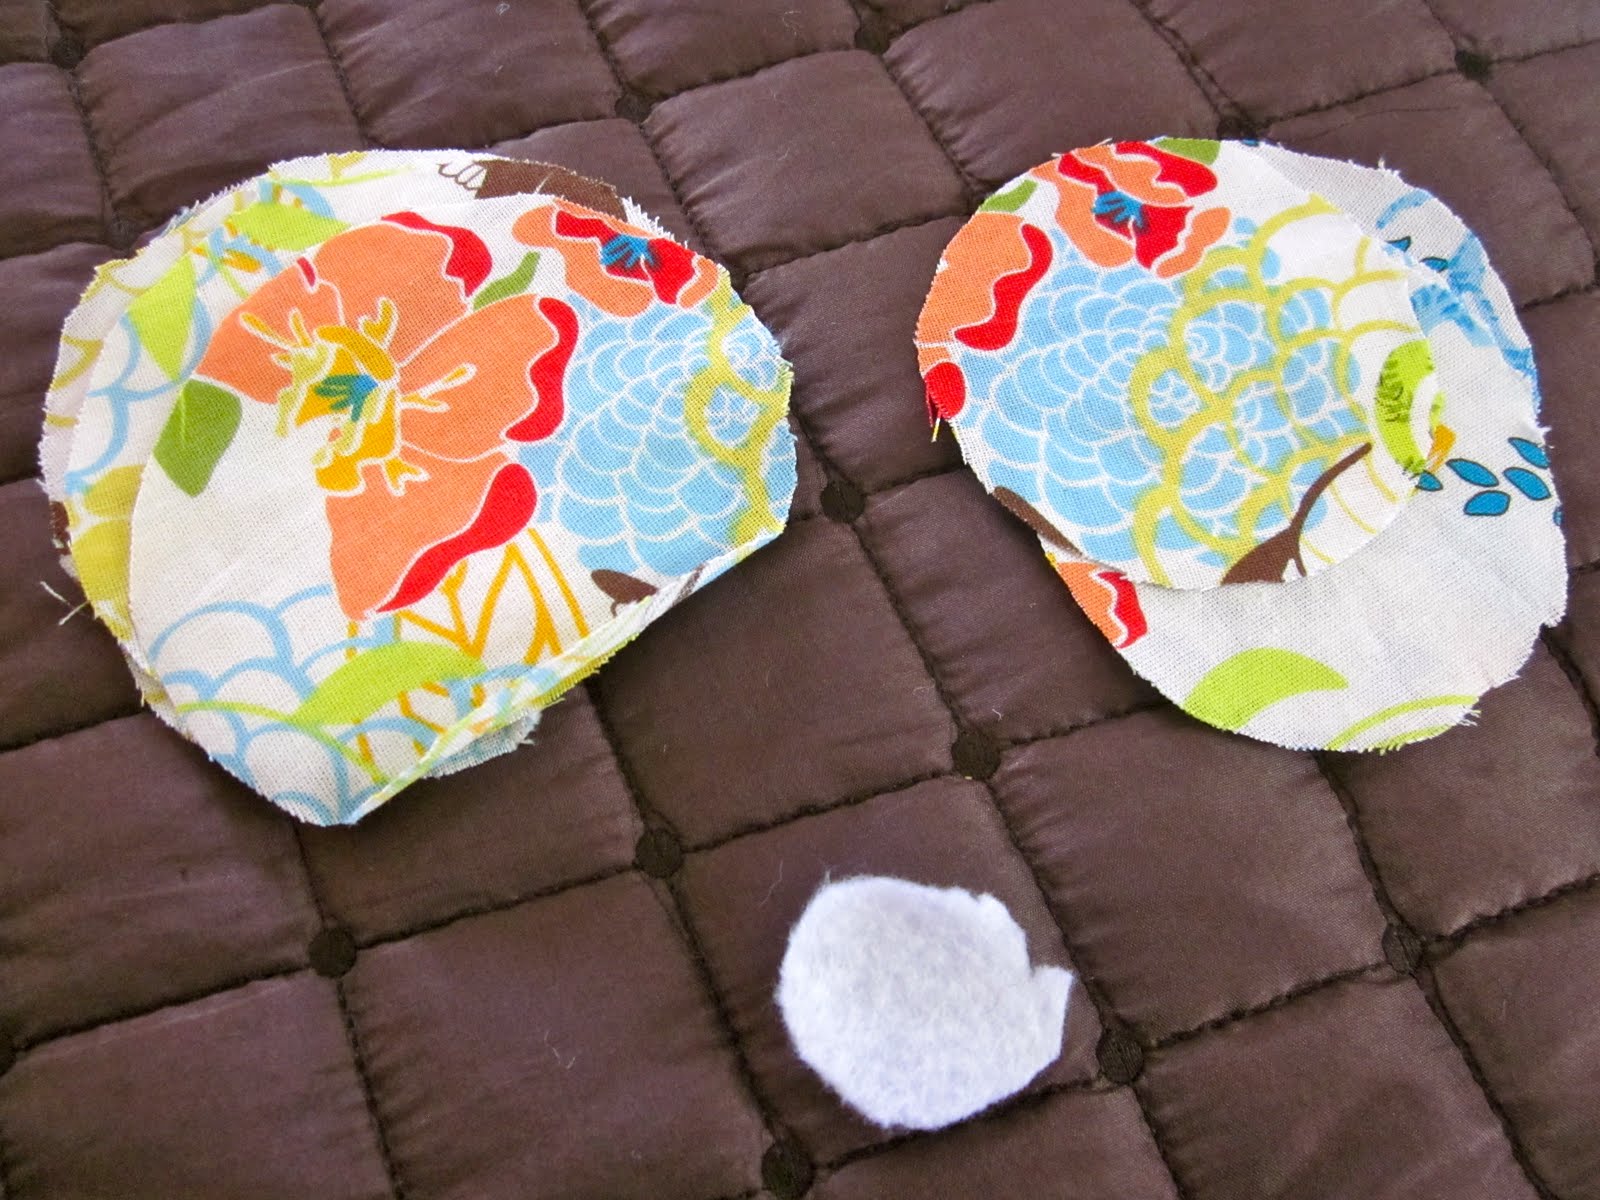
3.  Cut out 4 large circles and 4 medium circles, as shown above.
4.  Fold a large circle twice until it forms a triangle.  Place the newly folded circle on the felt like a pie-piece using your hot glue.

5.  Continue placing the larger circles until the "pie" is full.

6.  Repeat steps 4 and 5 with the medium circles.

7.  Place button of your choice on top!

Now, show off your new flower in your hair, on your bag, on a pillow in your den...wherever!
Key to making adorable fabric flowers...just relax and just your imagination.  As you can see I don't stress over perfection in my flowers.  I'm sure its driving some of your CRAZY, but its more fun to just chill and slap on some glue.  Now to using your imagination.  You can do anything.  What's great about crafts like this is making it your own.  You can use multiple buttons to stack for some added piazzazz!

Or you can do only a single layer for a more simplistic look.
Or use a fabric covered button or a rolled flower as the center.
(We will learn to make rolled flowers in part 3.)

Endless possibilities!  Hope you have fun making them like I did.

Tuesday, August 16, 2011

Sundays are Fundays for Crafting!

After several weeks of meaning-to and needing-to craft up some fabric flowers for both gifts and for fun, I FINALLY got around to it.  My husband was actually home on a Sunday and we spent the day playing with our puppy girl and getting some much needed relaxation...his in the form of a nap, mine in the form of crafting.  So I have 3 fabric flower tutorials coming your way!  Hooray!

Numero Uno:  The No-Sew, Folded Flower
I'm sure you've seen these.  They are fluffy and colorful and super easy to make.  They make cute hair accessories if you utilize hair pins or headbands or spice up that boring sweater, man's v-neck tee, or old purse you have.  So versatile...from your baby to your grandma!

Supplies:
Fabric of your choice
Felt
Glue gun and glue sticks
Scissors
Pen for tracing
 You will need either a headband, hair thing, bobby pin with plate for glueing, or a pin back plate like below.  However you want to use your flower.  I have used the bobby pin and the below pin back on a single flower before so it can be versatile.

Here goes:
1.  Heat up the glue gun.
2.  Cut out a felt circle as the base of your flower.  Size varies depending on the size of flower you are wanting to make...lets say the size of nickle or quarter depending on how BIG and BOLD you want your flower.
3.  Cut out 4 large circles and 4 medium circles.  For instance, I used approximately a 3" circle and a 2" circle.  Approximately because I measured with my finger and not a ruler.  As type A as I can be with some things, I am not an exact crafter or cook.  I prefer to relax and guesstimate.  So I used what I had handy... a glass and a candle.

4.  Fold a large circle in half and then in half again until it forms a triangle.  You will end up doing this to 7 of the 8 circles. 
Example:
I usually just fold them as I go but here is an example of all the folds at once.

5.  Place your large triangles on the felt like pieces of a pie using your hot glue.

6.  Add your second layer by folding 3 circles the same way.  Depending on the look you are going for you can cut the tip of the small triangle off to shorten it or apply it as it.  I chose to cut the tip off.
Side note:  I felt like my flower was looking a little "off" so I chose to apply another layer under the layer I has just applied in step 6.  I did this my cutting the tip off a circle of the same size and merely sliding it around the top 3 triangles.  I think it gives it a more layered look.

7.  Use the last small circle available and fold it as you have all the others.  Then fold it again.  So in all its 3 folds.  Then cut the tip off and apply it in the center of the flower in a vertical position.  Kind of like it is standing up.
Side note:  Again I felt like my flower need a little something-something so I added another flat layer like I did after step 6.

Voila!   A beautiful no-sew fabric flower!  I have fold that no two fabric flowers look the same.  As you can see in this tutorial I had to roll with the punches and improvise to produce my best product.  But this craft is super easy and fast!  Such a fun girls night project as you can see with my friends here.
Here I am wearing my first folded fabric flower.
See...Cute!

Stay tuned in the next few days for two more no-sew fabric flower tutorials!
Related Posts Plugin for WordPress, Blogger...